2012-06-26

Finished!

So, finally the project is finished! The result is a portable radio controlled plant-waterer with wireless soil moisture and tank level monitoring. I just mounted the sensor on one of the boxes and the result looks like this:
Currently I manage it via NetHome-server which allows me to control the watering schema with a DayLiteTimer-item so I can also connect the watering times with the sunset and sunrise.  The NetHome server also gives me remote access to it, so I can give the flowers some extra water even when I am in my summer house... It is of course possible to control it via the remote control or with any other 433MHz controller like Tellstick. as well.
The water “nozzles” used to spray the water on the plants are done in the simplest possible way. I just mount a flexible plastic tube over the flower pots and make tiny holes in the tube, one hole for smaller pots and two holes for larger. The mounted arrangement looks like this:

2012-06-24

Water level

I want to keep track of the water level in the tank as well and I tried the same brute force approach as for the soil moisture. Some variants of the temperature sensor I use can also measure air humidity. My guess was that this sensor is also resistive. The sensor I use does not  measure air humidity, but I guessed that all that is missing is the sensor and I was right, there were a few unused connectors on the board and when I attached a resistor, the sensor started giving humidity readings.

So I tried just connecting the sensor inputs to two leads on a piece of veroboard that I put in the tank, hoping that the resistance of the water would match some part of the range of the sensor.

It showed that the resistance got a bit too low, so I tried a slightly different approach with the two poles more separated:

This works better, but the precision is not very good. At least I get some indication of the level and a clear indication when the tank is empty as the water does not reach the poles.

2012-06-21

New NetHome Item

 
There is now a new NetHome Item in the nightly build: UPMSoilMoisture. It is really a variation of the UPMThermometer, but designed to use the UPM thermometer sensor as a soil moisture sensor. You can specify the levels for 100% and for 0% humidity (as they will vary depending on the impedance in the soil you use) and the UPMSoilMoisture-item will calculate a humidity percentage value from the impedance.  It keeps track of the highest and lowest “raw” values that it has seen to help setting the 100% and 0% levels. The accuracy is not brilliant, but you get a pretty good understanding of when it is time to water the plant...

2012-06-20

Sensing water

Next step is the sensors for soil moisture of the plants and water level in the tank. I don’t really need very high accuracy in either case, just some indication of the levels.


So I tried a very simple solution. I have been using wireless thermometers from UPM which have very cheap remote sensors sending on the 433MHz band. The actual temperature sensor is some kind of resistive NTC-sensor, and the resistance of the soil will wary with the water content, so I tried a very straight on solution: I cut off the sensor and mounted some random connector I had lying around, (just to get two metal pins with a fixed distance) and stuck that in the soil. And I was lucky – the resistance of the soil with different water content levels matches resistance range of the temperature sensor!


The NetHome-server can read the raw values from the wireless sensor and I get a range from a raw value of 1936 (soil saturated with water) down to 950 (soil dry). So just by cutting a cable I get a wireless soil moisture sensor! I know that you really should use AC current for this kind of measurement and that the resistance may be affected by a lot of other factors, but as ballpark figure this will probably do fine.

2012-06-17

Boxed


So now the design is mounted on the tank (boxes shown with the lids off). I use the bolts supplied with the tank to attach the boxes. I use DIN loudspeaker connectors to connect the wires to the boxes. I also included a fuse for the motor batteries, so I don’t start a fire on the balcony if the motor shorts.  The potentiometer is used to fixate the board in the box. The boxes also works as additional support for the tank which did not stand very steady on its own.
Now it’s time to start working on the sensors for plant moisture and water tank level.

Success


Success! I can now trigger the pump with the remote control (and with Nethome Server). I went for the simple robust solution with separate batteries for the pump and for the electronics. This also means that I don’t have to compromise with the voltage. I use four 1.2 V cells for the electronics which gives 4.8 V which is ok both for the receiver and the NE555 and I use six cells for the pump which gives 7.2 V. This means I get a bit more pressure on the water. The downside is that I cannot fit all in the box I intended to use, so I will have to use a separate box for the extra batteries.

2012-06-16

Fail

Major setback. I tried to do a full “function test” at the kitchen sink with all parts mounted and the pump connected to the relay and the batteries – and it failed miserably!

The pump never started and the relay just “buzzed” for a second. It shows that the pump draws so much current that the battery voltage drops way too low for the relay and the rest of the circuits. It did not help that I tried chargeable NiMH-cells.

It’s back to the drawing board. Either the electronics and the relay has to have some power regulator with a capacitor that can hold the voltage or they simply have to have separate power (batteries).

The board

Now that the circuit works, it’s time to start building it for real. This circuit is simple enough to just build on a piece of veroboard:


The plan is to fit both the board and the batteries in a small box, so I have to keep it fairly compact. To achieve this, I mount the receiver board on top of the veroboard. I use cut off resistor leads as “spacers” which are also used to supply power to the board:


The receiver board only needs 4,5 volts but the rest of the board (and the pump) gets 6 volts, so there is a small separate wire from the battery pack to the receiver.

Smoke on the water

OK, minor setback. I discovered some smoke and felt the smell of burned electronics, but could not find out why at first. Then I realized that the circuit drew out the batteries WAY to fast. It consumed close to 10 mA which is too much. At last I discovered that it seems to be the small LED-driver on the spotlight board that really did not like that I removed the LED:s. I cut the power and the input signal to it (the two pins at the blue arrow) by scraping off the copper leads with a knife.


Now the power consumption of that board is down to 500uA which is healthier for the batteries.

2012-06-13

The Timer

Now it’s time for the timer. When the switch is turned on, I want the pump to run for a couple of seconds and then turn off automatically. I want this behavior to prevent my balcony from getting flooded. In technical terms what I need is an edge triggered, non retriggerable monostable mutivibrator… aka – a timer.  I was looking a bit at modern equivalents of the 74LS121, but they are a bit hard to find and they cannot drive very much current. So in the end I fell for the good old NE555. I guess a digital boy would have gone for a PIC-processor, but I am old school. I also know the NE555 is totally outdated, but it is easy to work with, easy to find and the output stage packs enough punch to drive a relay directly. I will be paying a price in form of high power consumption, but I had one lying around, so I took that. The NE555 can easily be connected as a monoflop, but it is not edge triggered so I have to fix that externally.  The circuit I ended up with is shown below:


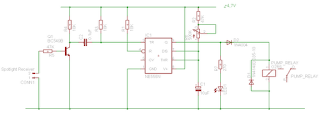
C1, R6 and R2 form the timing RC-circuit. It gives a max time around 7 seconds. D2 is a bit special, I read that it is needed to avoid the spike from the relay retriggering the circuit. I did not actually mount it on my board (I forgot it), but I put it in now when I made the schematic.
R3, C2, R4 makes the input edge triggered, as only flanks pass the capacitor.
I tried connecting the output from the receiver (the slaughtered spotlight) directly to the input, but the flank was not high enough, so I had to add R5, Q1 to amplify the signal. Below is the circuit tested on an experiment board.


2012-06-11

The Receiver


 The spotlight has a self learning receiver which can be programmed to a number of transmitters, the supplied remote control or the NetHomeServer for example. It is this receiver we are after.


Ok, time to take it apart. Below the surface is a nice little circuit board. You can see the antenna to the right and the LED:s in the middle. When I flip the circuit board it becomes more interesting.


To the right are the HF receiver parts. I guess the lower right and the far left circuits are some kind of power drivers for the LED:s and the top right is probably the receiver signal decoder. There is one connection that looks like a good candidate for being the decoded on/off-signal.

I have scraped off the coating on it to be able to solder a connector there (at the blue arrow). Measuring the voltage there shows that the level is close to 0 when the light is off and about 90% of full voltage when the lights are on. Ok – we have a receiver! Now all that is left is to remove the LED:s and remove the board from the housing.

The Parts

In my experience the best way to build something is actually to find something that does almost what you want, and then modify it. It is usually both cheaper and easier than to build it from scratch. In this case I found two brilliant parts: One windshield cleaner tank with two integrated pumps for 149 SEK (€15) and a remote controlled LED spotlight which Nethome can control for 129 SEK (€12).


The tank with pumps, I can use as it is. I tested it, and it works fine, but it draws a LOT of current: 2-3 A when operating at 7 Volts. It is designed for 12 V, but I don’t need so high pressure and want to have fewer batteries (and lower power consumption). The tank holds 2,5 liters which is a bit small, but I can connect it to a bit larger tank via the unused pump connection when I need to be away for longer periods.
The spotlight uses the 433MHz band with the NEXA-protocol  for the remote control. I will just use the receiver from it, so I have to take it apart and try to find the on/off signal which I will use.

2012-06-10

Watering Plants


Last year the plants on my balcony did not really do that well, I guess they could have used some water during the vacation.

This year I have decided to go nerd on the problem: I am building a remote controlled plant watering pump which is controlled by Nethome Server.  I also want it to be able to measure the moisture level in the plant soil and preferably also the water level in the tank.

I don’t want wires across the apartment and out on the balcony so the unit has to be battery powered and remote controlled. I don’t want to worry about flooding the balcony while I am away, so it must have a local tank with limited amounts of water (in case of a leak or malfunction)

Since I will be using the open 433MHz band for controlling it, I don’t really want to control the pump totally via radio (what if the “off” signal is drowned in interference?) so I also want the local hardware to control how long the pump is running each time with some sort of timer.  Next step:  find suitable parts…