2012-06-13

The Timer

Now it’s time for the timer. When the switch is turned on, I want the pump to run for a couple of seconds and then turn off automatically. I want this behavior to prevent my balcony from getting flooded. In technical terms what I need is an edge triggered, non retriggerable monostable mutivibrator… aka – a timer.  I was looking a bit at modern equivalents of the 74LS121, but they are a bit hard to find and they cannot drive very much current. So in the end I fell for the good old NE555. I guess a digital boy would have gone for a PIC-processor, but I am old school. I also know the NE555 is totally outdated, but it is easy to work with, easy to find and the output stage packs enough punch to drive a relay directly. I will be paying a price in form of high power consumption, but I had one lying around, so I took that. The NE555 can easily be connected as a monoflop, but it is not edge triggered so I have to fix that externally.  The circuit I ended up with is shown below:
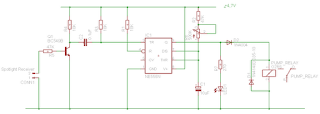

C1, R6 and R2 form the timing RC-circuit. It gives a max time around 7 seconds. D2 is a bit special, I read that it is needed to avoid the spike from the relay retriggering the circuit. I did not actually mount it on my board (I forgot it), but I put it in now when I made the schematic.
R3, C2, R4 makes the input edge triggered, as only flanks pass the capacitor.
I tried connecting the output from the receiver (the slaughtered spotlight) directly to the input, but the flank was not high enough, so I had to add R5, Q1 to amplify the signal. Below is the circuit tested on an experiment board.


2012-06-11

The Receiver


 The spotlight has a self learning receiver which can be programmed to a number of transmitters, the supplied remote control or the NetHomeServer for example. It is this receiver we are after.


Ok, time to take it apart. Below the surface is a nice little circuit board. You can see the antenna to the right and the LED:s in the middle. When I flip the circuit board it becomes more interesting.


To the right are the HF receiver parts. I guess the lower right and the far left circuits are some kind of power drivers for the LED:s and the top right is probably the receiver signal decoder. There is one connection that looks like a good candidate for being the decoded on/off-signal.

I have scraped off the coating on it to be able to solder a connector there (at the blue arrow). Measuring the voltage there shows that the level is close to 0 when the light is off and about 90% of full voltage when the lights are on. Ok – we have a receiver! Now all that is left is to remove the LED:s and remove the board from the housing.

The Parts

In my experience the best way to build something is actually to find something that does almost what you want, and then modify it. It is usually both cheaper and easier than to build it from scratch. In this case I found two brilliant parts: One windshield cleaner tank with two integrated pumps for 149 SEK (€15) and a remote controlled LED spotlight which Nethome can control for 129 SEK (€12).


The tank with pumps, I can use as it is. I tested it, and it works fine, but it draws a LOT of current: 2-3 A when operating at 7 Volts. It is designed for 12 V, but I don’t need so high pressure and want to have fewer batteries (and lower power consumption). The tank holds 2,5 liters which is a bit small, but I can connect it to a bit larger tank via the unused pump connection when I need to be away for longer periods.
The spotlight uses the 433MHz band with the NEXA-protocol  for the remote control. I will just use the receiver from it, so I have to take it apart and try to find the on/off signal which I will use.

2012-06-10

Watering Plants


Last year the plants on my balcony did not really do that well, I guess they could have used some water during the vacation.

This year I have decided to go nerd on the problem: I am building a remote controlled plant watering pump which is controlled by Nethome Server.  I also want it to be able to measure the moisture level in the plant soil and preferably also the water level in the tank.

I don’t want wires across the apartment and out on the balcony so the unit has to be battery powered and remote controlled. I don’t want to worry about flooding the balcony while I am away, so it must have a local tank with limited amounts of water (in case of a leak or malfunction)

Since I will be using the open 433MHz band for controlling it, I don’t really want to control the pump totally via radio (what if the “off” signal is drowned in interference?) so I also want the local hardware to control how long the pump is running each time with some sort of timer.  Next step:  find suitable parts…

2012-04-30

NetHomeServer 0.10 released


NetHomeServer 0.10 is now released! The functions have been available in the nightly builds for quite a while, so I guess the only real difference is that I have documented the new Items on the Wiki. The release notes can be found at: http://wiki.nethome.nu/doku.php/nethomeserver_release010. The big change is that the new WEB GUI is now the officially supported GUI. This GUI is much more focused on actually controlling the devices and giving an overview. It also offers more support when configuring actions in other Items. The old one is still present, but will be phased out. Other highlights are: support for Waveman, Nexa absolute dim, Rising Sun and TeamCity.

2012-04-15

Beeing alarmed


A user mailed last week and wanted his car warmer to start in the morning if the temperature was below a certain level and asked if there was no Item that could act on temperature levels (like a thermostat). This seemed like such an obvious function so I actually had to check if it was not already there – and it was not! So now I have made the new HomeItem “ValueTrigger”. You specify an attribute in another Item (a thermometer for example) and specify a max and a min level, together with actions to be performed if the value goes above max or below min. There are also separate methods which are called once a minute as long as the value is above max or below min. The Item has enable and disable actions so you can use a timer to only activate it during specific time periods.This is now in the nightly build.

2012-04-10

Dogfooding

I do use the NetHomeServer server at home and the latest builds (nightly builds) are always available on the web site (install page), so when I installed the server at work I tried to use the latest nightly build. I realized that a lot of the stuff I use at home was not there, the start scripts for different OS versions and the latest swt-libraries for example. I have now fixed this, so the nightly builds now contain start scripts for 32 bit windows, Linux and OSX, 64 bit windows, Linux and OSX and OSX carbon.